- Pipeline Syntax란?
- Maven Build
- Tomcat 배포
- 1. Pipeline Script에 내용을 추가한다.
- 2. Pipeline Syntex
- 3. Containers 추가 및 정보 입력
- 4. General PipelineScript 생성
- 5. Pipeline Script 작성
- 6. Tomcat에 배포여부 확인 및 삭제
- 7. 배포 후 확인
- Docker Container 배포
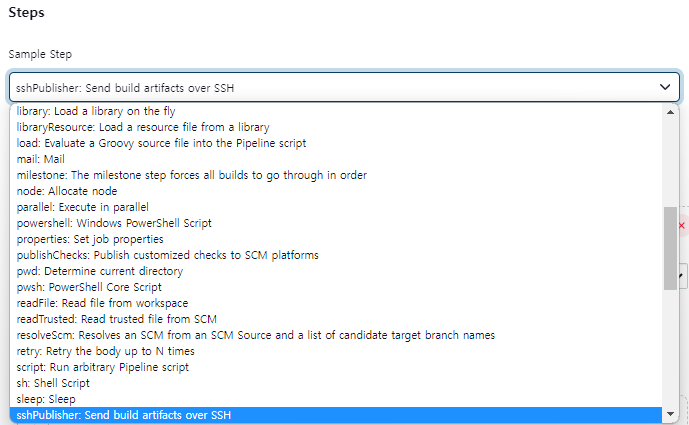
- 1. 구성 - Sample Step - sshPublisher: Send build artifacts over SSH선택
- 2. Docker에 가지고 있는 SSH서버의 컨테이너인 docker-server를 선택한다.
- 3. Jenkins에 등록된 SSH Server 확인
- 4. Pipeline Syntax를 활용하여 스크립트 생성하기.
- 5. Generate Pipeline Script 복사 후 stage 추가 및 완성
- 6. Docker에서 배포 전 초기 설정하기
- 7. 지금 빌드
Pipeline Syntax란?
현재 예제에서는 Jenkins Sever에서 Pipeline Script로 실행하고자 하는 외부의 스크립트를 가지고 와서 Script를 실행한다.
깃허브로 부터 코드를 가져온 뒤 리포지토리 안에 들어있는 Shell Script 파일을 실행하는게 목적이다.
Shell Script를 실행하는데 필요한 깃을 가져오는 코드를 작성하는 문법을 자동으로 생성할 수 있게 하는 기능이다.
현재 사용중인 Jenkins는 Docker 형태로 기동되고 있다.
Docker라는 것은 리눅스를 통해 젠킨스가 작동되고 있기 때문에 sh확장자인 Shell Script 파일을 실행한다.
Docker를 사용하지 않고 직접 Jenkins를 구성하였다면 bat확장자의 배치파일로 실행한다.
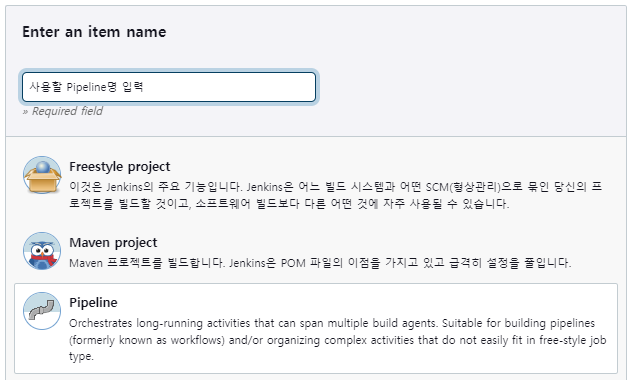
1. Item - Pipeline 생성
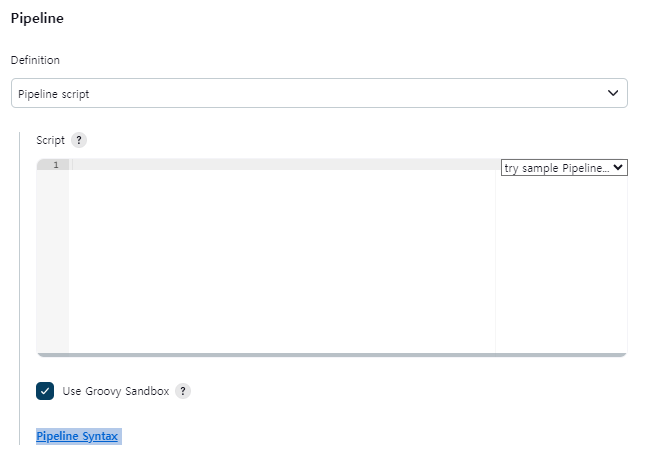
2. Pipeline Syntax (Configure - Pipeline)
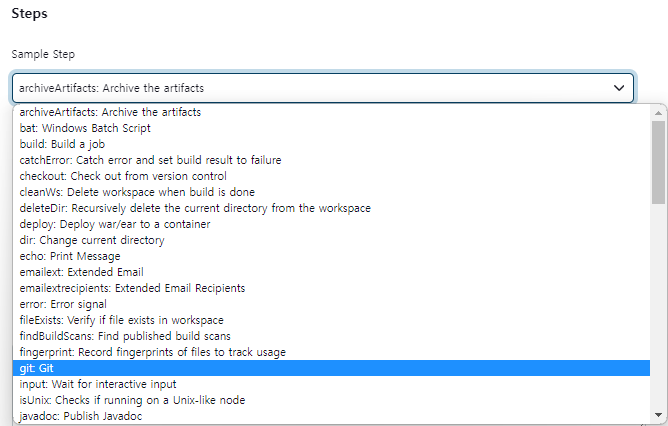
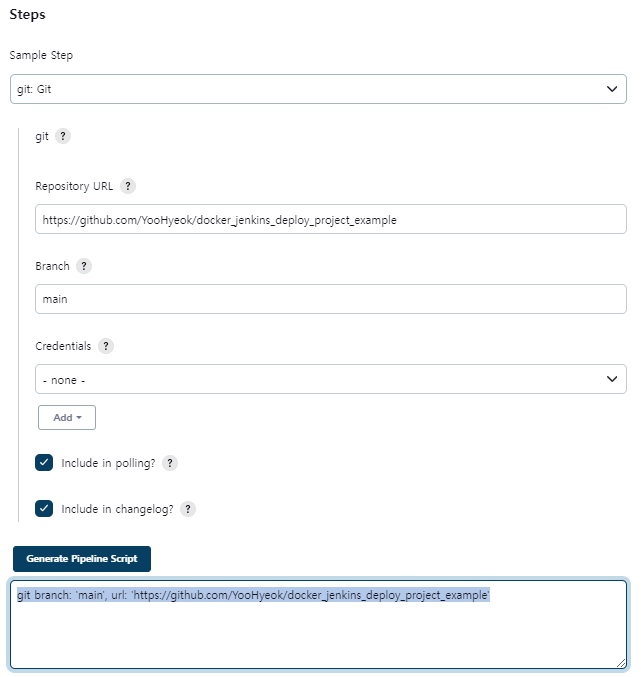
3. Steps - git: Git
4. Branch 입력 후 Generate Pipeline Script 클릭
만약 기본 Branch가 master가 아니고 main이더라도 main이라고 입력하지 않는다.
master Branch일때 Generate Pipeline Script를 통해 Git Sysntax Command를 생성하면 git '레포지토리주소' 형태로 구문이 작성되지만
git 'https://github.com/YooHyeok/docker_jenkins_pipeline_script_example'master가 아닌 main이나 다른 브랜치명을 기제하게되면 Command형태가 바뀌어버린다.
git branch: 'main', url: 'https://github.com/YooHyeok/docker_jenkins_pipeline_script_example'(위의 내용을 ShellScript에 기재하면 오류가 발생한다... 따라서 기본 브랜치가 main일지라도 master Syntax로 해야한다.)
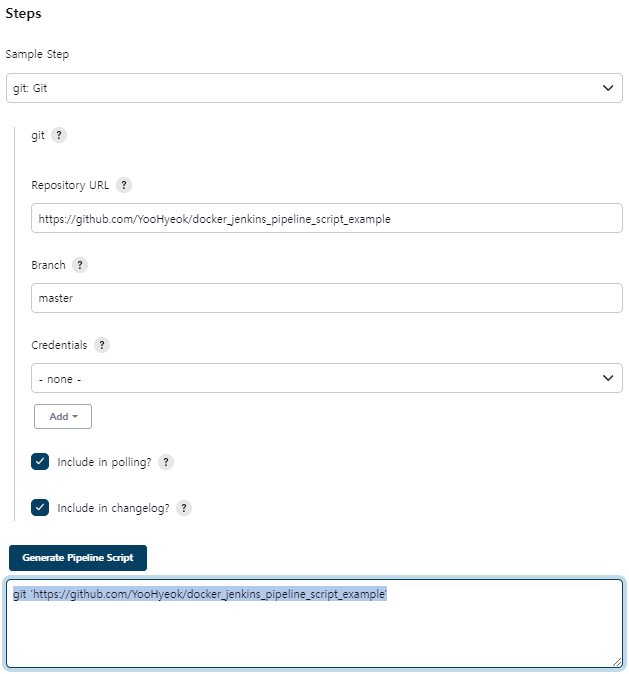
5. Git Command 복사 - Pipeline Script에 반영
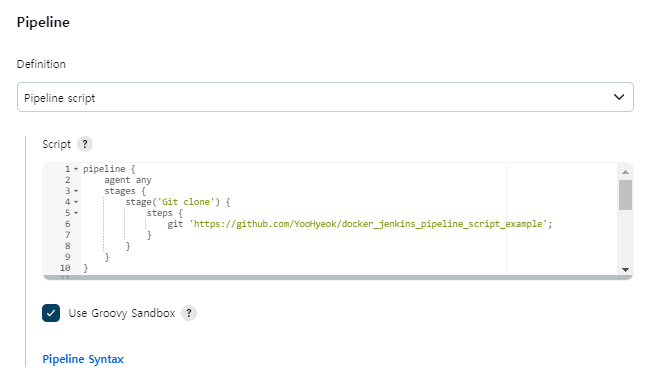
전체 내용은 깃에 있으므로 깃 리포지토리의 pipeline_sample3.yml파일의 내용과 pipeline_sample2.yml을 참고한다.
pipeline {
    agent any
    stages {
        stage('Git clone') {
            steps {
                git 'https://github.com/YooHyeok/docker_jenkins_pipeline_script_example';
            }
        }

        stage('Compile') {
            steps {
                echo "Compiled successfully!";
                sh './build.sh'
            }
        }

        stage('JUnit') {
            steps {
                echo "JUnit passed successfully!";
                sh './unit.sh'
            }
        }

        stage('Code Analysis') {
            steps {
                echo "Code Analysis completed successfully!";
                sh './quality.sh'
            }
        }

        stage('Deploy') {
            steps {
                echo "Deployed successfully!";
                sh './deploy.sh'
            }
        }
    }
    post {
      always {
        echo "This will always run"
      }
      success {
        echo "This will run when the run finished successfully"
      }
      failure {
        echo "This will run if failed"
      }
      unstable {
        echo "This will run when the run was marked as unstable"
      }
      changed {
        echo "This will run when the state of the pipeline has changed"
      }
    }
}
post : 성공적으로 끝났을때 진행되는 동작
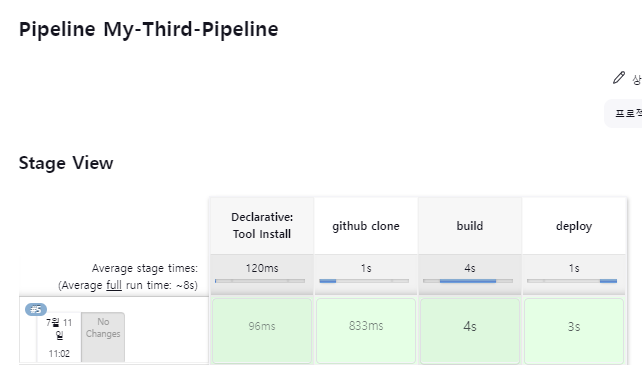
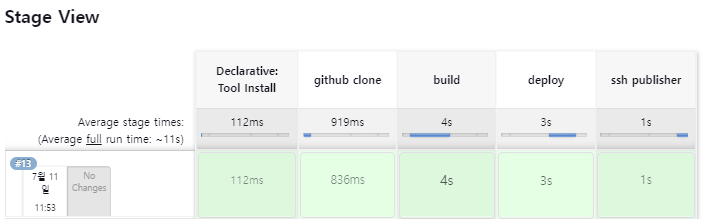
6. 지금 빌드 후 Stage View 확인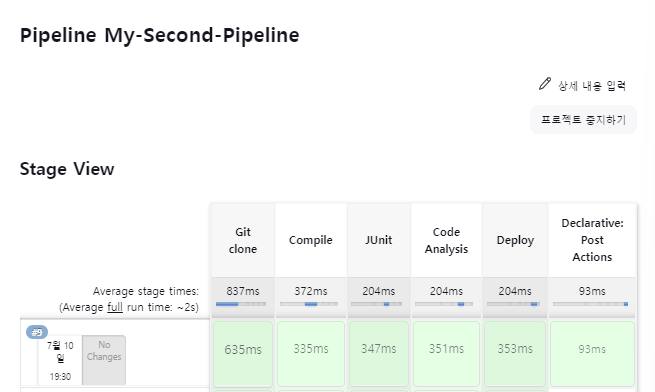
Maven Build
1. Pipeline Item 생성
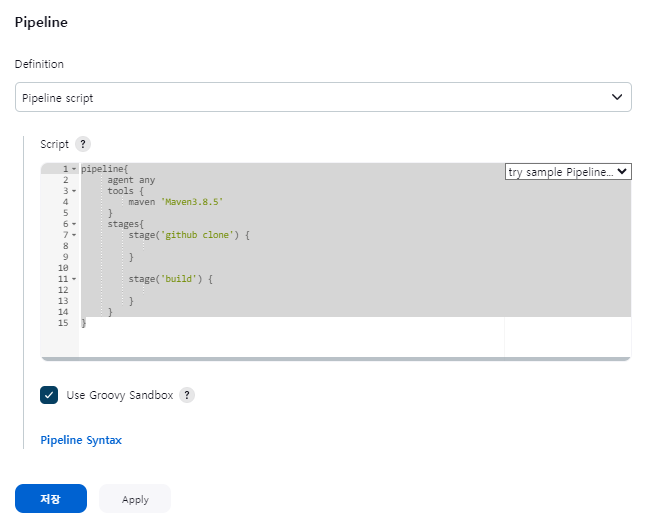
2. Pipeline Script 내용 작성
전과 동일하며, tools 항목을 추가한다.
pipeline{
     agent any
     tools {
         maven 'Maven3.8.5'
     }
     stages{
         stage('github clone') {
             steps {

             }
         }

         stage('build') {
             steps {

             }
         }
     }
}
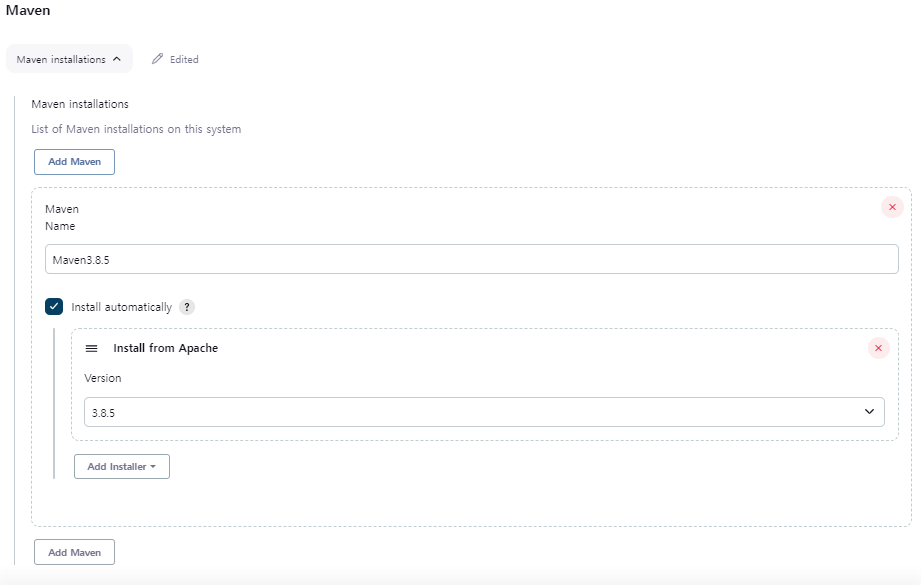
3. Jenkins의 Maven 버전 확인 or 설정
Dashboard - Jenkins관리 - Tools - Maven - [Maven Installations] 등록 확인.
주의할 점은 2번 작업에서 toos에 지정한 maven이름과 현재 Installations에 지정한 Maven name이 일치해야한다.
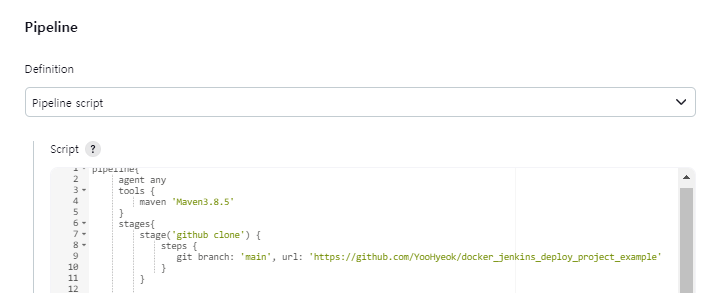
4. Pipeline Syntax (직전에 생성한 Pipeline의 구성정보에서 Script 작성)
4-1) Steps에서 깃허브 RepositoryURL과 Branch명을 입력한 뒤 Generate Pipeline Script Command를 복사한다.
4-2) Pipeline으로 돌아와서 Pipeline Script에 복사한 내용을 채워준다.
pipeline{
     agent any
     tools {
         maven 'Maven3.8.5'
     }
     stages{
         stage('github clone') {
             steps {
                git branch: 'main', url: 'https://github.com/YooHyeok/docker_jenkins_deploy_project_example'
             }
         }

         stage('build') {
             steps {

             }
         }
     }
}
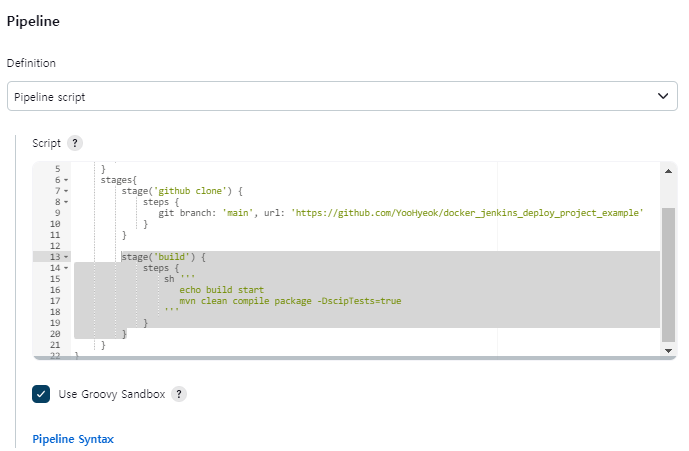
5. Shell Script 내용 추가
구문은 sh ''' '''와 같이 Single Qutation 3개 입력하고 코드를 입력한다.
pipeline{
     agent any
     tools {
         maven 'Maven3.8.5'
     }
     stages{
         stage('github clone') {
             steps {
                git branch: 'main', url: 'https://github.com/YooHyeok/docker_jenkins_deploy_project_example'
             }
         }

         stage('build') {
             steps {
                 sh '''
                    echo build start
                    mvn clean compile package -DscipTests=true
                 '''
             }
         }
     }
}
Tomcat 배포
1. Pipeline Script에 내용을 추가한다.
stage('deploy') {
            steps {

            }
         }
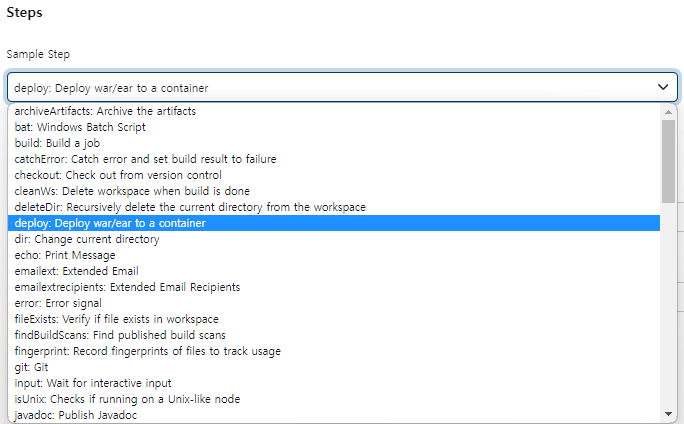
2. Pipeline Syntex
2-1) 구성 - Sample Step - deploy: Deploy war/ear to a container 선택
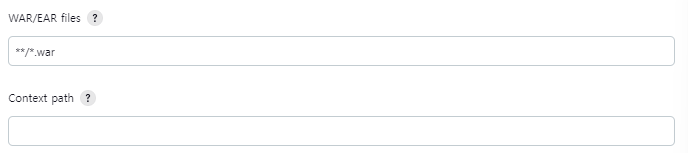
2-2) deploy 정보 입력
**/*.war 의미 : 현재 디렉토리 기준 상위/하위에 존재하는 모든 .war파일을 대상으로 Build한다.
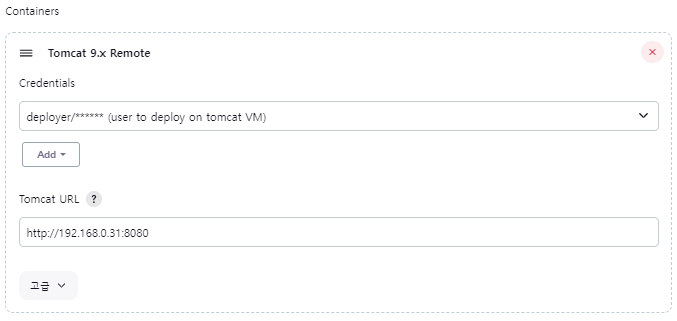
3. Containers 추가 및 정보 입력
주의할 점은 Tomcat URL란에 입력할 [IP주소+포트번호] 앞에 http://를 먼저 입력해줘야한다.

4. General PipelineScript 생성

5. Pipeline Script 작성
stage('deploy') {
            steps {
                deploy adapters: [tomcat9(credentialsId: 'deployer_user', path: '', url: 'http://192.168.0.31:8080')], contextPath: null, war: '**/*.war'
            }
         }
6. Tomcat에 배포여부 확인 및 삭제
우측 [배치된 것을 제거] 클릭
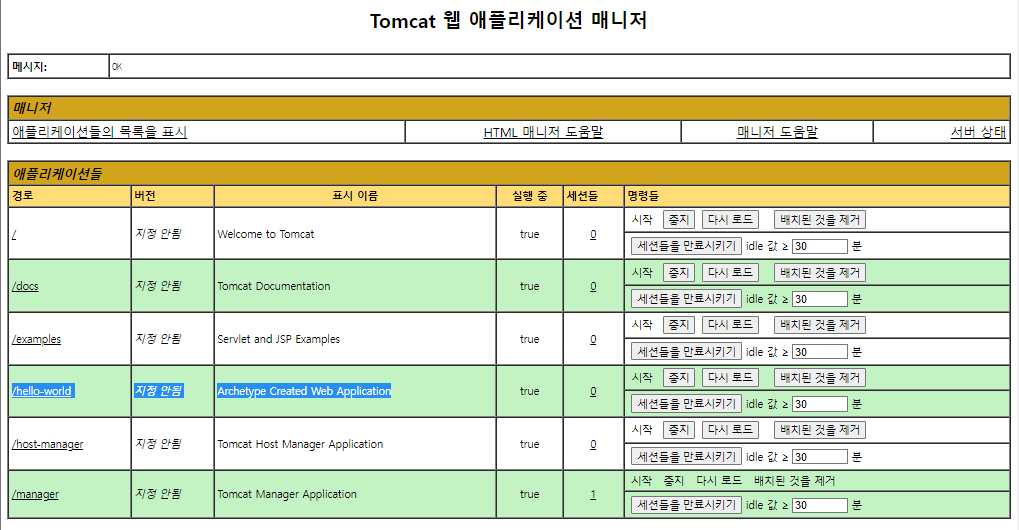
7. 배포 후 확인
Docker Container 배포
참고 (이전시간에 했던 작업들)

1. 구성 - Sample Step - sshPublisher: Send build artifacts over SSH선택
2. Docker에 가지고 있는 SSH서버의 컨테이너인 docker-server를 선택한다.

3. Jenkins에 등록된 SSH Server 확인
Jenkins관리 - System - Publish over SSH
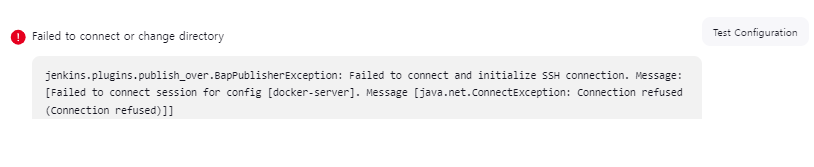
Test Configuration이 Failed이라면 Docker에 SSH Server Container가 기동중인지 확인해보고 기동중이 아니라면 기동시킨다.

기동시킨 후 다시 TestConfiguration을 진행하면 Success하게 된다.
4. Pipeline Syntax를 활용하여 스크립트 생성하기.
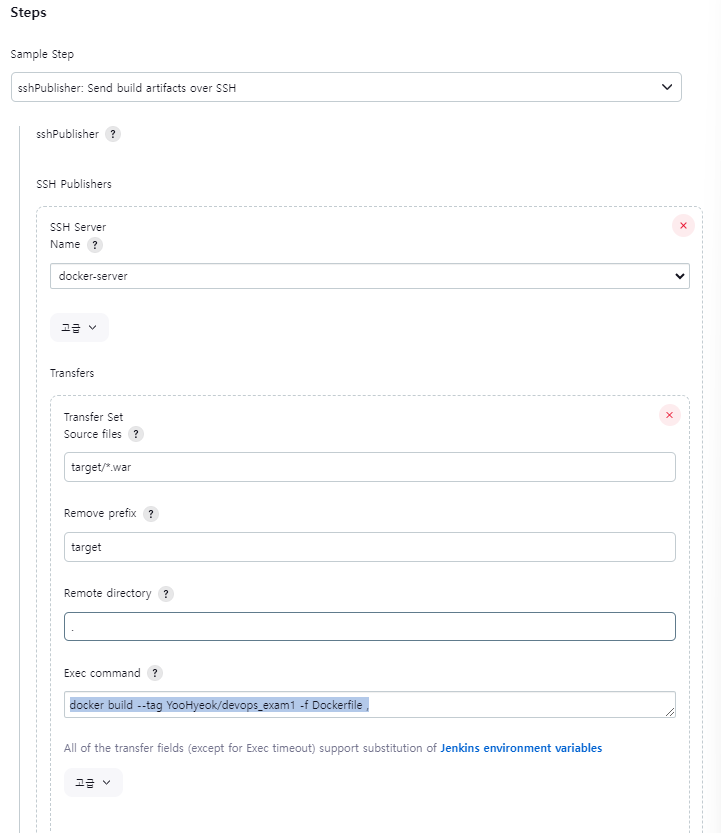
Exec command 입력
주의할 점은 tag이름 첫글자는 소문자로 해야한다. (대문자로 할 경우 unstable오류가 발생한다.)
docker build --tag=yooHyeok/devops_exam1 -f Dockerfile .
5. Generate Pipeline Script 복사 후 stage 추가 및 완성

stage('ssh publisher') {
             steps {
                 sshPublisher(publishers: [sshPublisherDesc(configName: 'docker-server', transfers: [sshTransfer(cleanRemote: false, excludes: '', execCommand: 'docker build --tag yooHyeok/devops_exam1 -f Dockerfile .', execTimeout: 120000, flatten: false, makeEmptyDirs: false, noDefaultExcludes: false, patternSeparator: '[, ]+', remoteDirectory: '.', remoteDirectorySDF: false, removePrefix: 'target', sourceFiles: 'target/*.war')], usePromotionTimestamp: false, useWorkspaceInPromotion: false, verbose: false)])
             }
         }
6. Docker에서 배포 전 초기 설정하기
[SSH 접속]
# ssh root@localhost -p 10022
└[패스워드 입력]

[SSH 디렉토리 목록 보기]
# ls -al
[목록에 존재하는 war파일 삭제]
# rm -rm hello-world.war

[이미지 확인]
# docker images
[이미지 삭제]
# docker rmi [이미지아이디]
7. 지금 빌드
Jenkins로 빌드 후 Docker에서 imange가 생성되었는지 확인 해 본다!!
# docker images
'CI CD InfraStructure > Jenkins' 카테고리의 다른 글
| [Jenkins] Multi nodes 구성 (Master/Slave) (0) | 2023.07.12 |
|---|---|
| [Jenkins] Sonarqube 연동 및 Pipeline 사용 (0) | 2023.07.12 |
| [Jenkins] Pipeline Item 생성, Pipeline script 작성 (0) | 2023.07.10 |
| [Jenkins] Delivery Pipeline 구축 및 시각화 플러그인 설정 (0) | 2023.07.10 |
| [Jenkins] Jenkins에서 SSH 세팅 및 Item (Project) 배포 (0) | 2023.07.10 |